DMD T865 & T865X
For both T865 and T865X navigation devices. Learn how to mount, connect and operate the device.

João Pereira
About Device
The T865 is an 8" Android 14 navigation tablet.
Some of its highlights include a huge 8000mA battery, high precision GPS, IP67 rating, capable of handling temperatures up to 60C without discharging the battery, 2x SIM Card, both M9 connector and pins for power and wired remote controller.
The T865X model includes 128GB Storage and a 1300 nits LCD with a thick high clarity Glass.
All our devices include our DMD2 app, and a series of original system apps like the SOS app, Auto Off Manager and Buttons.
This is our best selling device and for more details please check the product page.
Revision History:
First T865 - No back connector, plastic holder
Revision 1 - Metal Holder, new harness, DMD logo in the front glass
Revision 2 - Back M9 Connector, new harness, new packaging, metal holder with side and rear key
Revision 3 - New X model with 1300 nits and 128GB Storage
Revision 4 - Anti Glare coating with thicker Glass - Front Camera removed
Revision 5 - Reverted to Glare - Thick glass with improved clarity
Quick Reference
Box Contents
T865X Navigation Tablet
One T6x40 Torx key - For the cover to access SIM and SD card slots.
3 pull adhesives for SD and SIM card easy removable.
User selectable holder:
Motorcycle Road & Light Adventure - Includes Full motorcycle harness and 2 lock keys
Motorcycle Off-Road - Includes Full motorcycle harness and 4 lock keys
4x4 & Overlanding Holder - No cables included (powered by USB) - Includes 2 lock keys

Warranty
All our devices include a two years warranty.
For general questions and first instance support you can contact us directly. For hardware related issues and repairs you can also contact us directly if you are in EU and if you are outside EU you should contact the point of sale.
Notice 1: For holders with charging pins, the pins are not covered by warranty if there are signs of any damage, this includes bent and oxidized pins.
Notice 2: For the Road & Light Adventure holder the charging pins are considered a secondary charging method, the included M9 connection is the preferred connection type, any damage to the pins caused by off-road riding are not covered by warranty and the user should switch to the referred M9 cable instead.
Certification
We make sure all our devices follow the regulations and norms of the different markets where we sell them.
Conformity & Compliance: CE, FC, IC, UKCA, PTCRB, RCM, RoHS Compliant, Reach Compliant, Weee.
Resistance Ratings: IP67 & MIL-STD (USA Military Drop Test)


Device Legend
User Configurable Buttons P1-P2-P3 (setup in the Buttons app)
Volume and Power Buttons
Headphone and USB Type-C Port - Lift caps (does not require removing the screw)
M9 Connector (included with motorcycle holders) - For power + remote controller
Pins for holders with pins - For power + remote Controller
External GPS Antenna (optional for Overlanding)
SD Card and Sim Cards compartment
Expansion modules slot


Connect the harness
If you are running the device on a motorcycle you will need to connect the harness to your motorcycle 12V, usually an accessory plug which is post ignition (so that power is cut when you turn off the key). For 4x4 / Overlanding setups the car holder uses a simple TypeC connection for power.
Motorcycle Harness:
Red Wire - Connect to motorcycle 12V
Black Wire - Connect to motorcycle ground
Green Wire - Used to trigger shutdown if red and black wires are connected directly to battery. Ideally you should ignore this wire, red and black should be connected post ignition and when it is so, the green wire is not used since shutdown will be triggered on red wire power cut.
Motorcycle Harness Connectors
There are 3 connectors on the motorcycle harness, two are exactly the same and one is specific for our remote controllers!
1 & 2 - Connect to Holder with pins (if you have the road/adventure holder) or/and connect to the M9 connector for off-road holder (you can even connect both at the same time). You can also use one of these connectors to power our USB charger accessory.
3 - Connect this connector to our wired remote controller like the DMD Remote 2.


M9 Connector
This connector connects to the back of the tablet and to the motorcycle harness connector 1 or 2. It is required if you are using the off-road heavy duty holder and optional if you are using the road & adventure holder.
Please notice you cannot change the angle of the connector, the tablet female connector is fixed and should not be forced!
Also notice that the M9 female in the tablet is waterproof, even without the protection cap!
4x4 / Overlanding Holder
To power the holder you need to use the USB Type-C connection, make sure your car charger is powerful enough, usually with the specification for QC / PD. The charger is not included and you probably already own one to charge your phone.
There are other connectors on the back of the holder, two USB ports to connect accessories and even a LAN port if you want to connect to a Starlink router for example.


Device System Updates
To make the firmware updates as simple as possible, every time we release an update you simply get a notification to update, just tap on the notification and it will start the download. There are two types of firmware updates, complete updates which will move the firmware version up and included latest security updates, and partial updates which only update certain system apps and device settings, both use the same notification tap method.
If you have a pending firmware update, when you start our DMD2 app, it will also notify you and ask you to update.
After accepting the update, it will start downloading in the background, you can track the progress in the notification. When the download finishes the tablet will restart and apply the updates.
Software
All our devices include our original system app "Manage" that allow you to manage features like the auto off, device hardware buttons, setup remote controllers and even an SOS/Alarm system.
When you first run the device it is highly recommended that you check this app to make sure everything is correctly setup the way you want it.

Auto Off
Control an automated device shutdown either when power is cut, a certain amount of time passed while device was inactive or even using the green trigger wire (motorcycle harness).
You can choose to use it only when the device is in the holder, choose between full power off or just screen turn off and you can set it to show a dialog with a timer.

Remote Controller & Device Buttons
Setup the functions for the device hardware buttons (P1,P2,P3) and actions for when you insert or remove the device on the holder.
Setup the Remote Controller communications, if you have a remote controller you need to make sure you run the app and detect the remote at least once. Use the app to check and test the remote controller.

SOS
The SOS system will detect falls and send a user configurable SMS with the user location to up to two contacts. If the user is using the DMD2 riding groups feature it will also trigger the "Help Me" feature for the user group.
The SOS system also includes an Alarm system, that when you leave the device in the motorcycle, with the screen turned off, if someone moves the motorcycle it will trigger an alarm and send you an alert to your phone number.
Any questions?
Check out the FAQs
Still have unanswered questions and need to get in touch?
Still have questions?
Call or write usStill have questions?
Chat with usCheck the complete DMD FAQ too.
In short, NO. Our devices include a GPS chip and antenna and you can use any navigation app without a SIM Card.
You should however be aware that there are both online navigation apps (which require internet connection) and off-line apps (that do not require any connection), usually offline navigation apps will allow you to pre-download all the map data so that you can use the device offline.
For the DMD2 app, internet connectivity is only needed to conduct online search for addresses, download maps, some extra optional online map layers and for the Group Share functionality, otherwise, it can remain offline and fully functional.
If you want any of the online features while riding, you can share your pocket phone internet connection (hotspot) or use a SIM card if your device supports it.
Get Link

If the exit button is not available in the bottom menu, chances are, you set DMD2 as your device default home app.
The default home launcher is the app which is shown when your device first starts or when you press the home button.
Some users want their devices to behave more like a traditional Android device, with a regular or stock launcher where they can launch any app including DMD2. Other users will use the tablet mostly on their motorcycles and want DMD2 to be the default home app. For this reason DMD2 can be setup as the default home app or you can use it as a regular app.
Whatever you prefer, notice that you can always change this at any time. The default home app is an Android setting that can be changed in the Android settings.
The place where you change this is in Android Settings > Apps > Default apps > Home app.
Check the video bellow to see how to get to the "default home" Android setting:

Get Link
Updates from the Google PlayStore only work when DMD2 was installed from the PlayStore. If the device is a DMD Navigation unit, or you have installed the DMD2 APK version, updates are pushed automatically and you get a notification to update from within the app - do not use the PlayStore for updates and do not worry about Play Store.
Get Link
If no on-screen keyboard pops up when you tap on any text input type box chances are you need to enable the "On-Screen Keyboard" setting in the Android input settings. This usually is required to do once when you connect a remote controller by bluetooth.
You can find this setting in Android Settings app > System > Language / Input.
In the video you can see a case for this issue, you can also notice that when this happens you usually have a persistent notification that you can tap to then enable the on-screen keyboard.

Get Link
By default when you plug our devices to a PC it will only charge the device.
If you want to access the device files from the PC you need to enable File Transfer in the device settings.
To do this you can check this video:
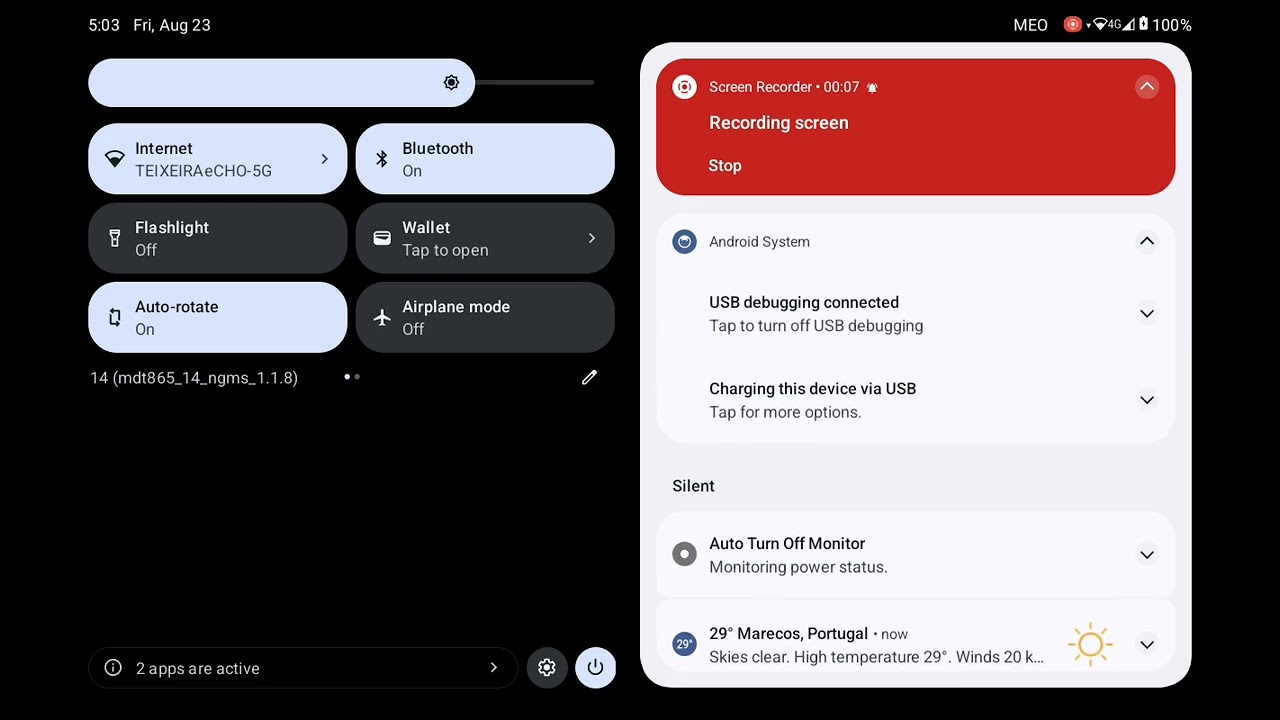
- Swipe down from the top of your screen
- Tap on the notification that says "Charging this device via USB"
- In the USB Preferences enable "Use USB for - File Transfer"
Get Link

The Manage app is a device system application, specific to DMD Navigation devices. If you have a DMD Navigation device and you cannot find these apps pre-installed, please contact support, we can easily fix it with a remote FW update push.
Get Link
This is not uncommon and is due to the screen being activated by water drops. Using the Manage App (a system app available on all our devices), configure one of the available device hardware buttons to enable/disable screen touch. This way, when riding in the rain, you can lock the screen touch!
Inside the DMD2 app you will even find an option to automate this while you ride and you can even assign this function to one remote controller button.
Get Link