Map Basics & Legend
Understanding the basics of the map - the base interface (what is each button) and the actual map data legend (road colors and icons).

João Pereira
90% of DMD2 is the Map!
We have no doubt that the map is where our team spends more time developing, it is the center piece, everything else is secondary and built around it.
Our map is developed to be optimized for use while riding, minimal user interaction, remote controller support for the most used functions and everything you would normally need while riding should be one or two taps aways.
The map UI has informative overlays which are configurable, like indicator widgets for speed, trip, OBD and much more, and (usually on the left) progress indicator boxes if you have an active navigation or you are following a GPX file.
In this document we will talk about the basics of the map, and what each button does. Scroll down to check also the map legend with the different road colors.

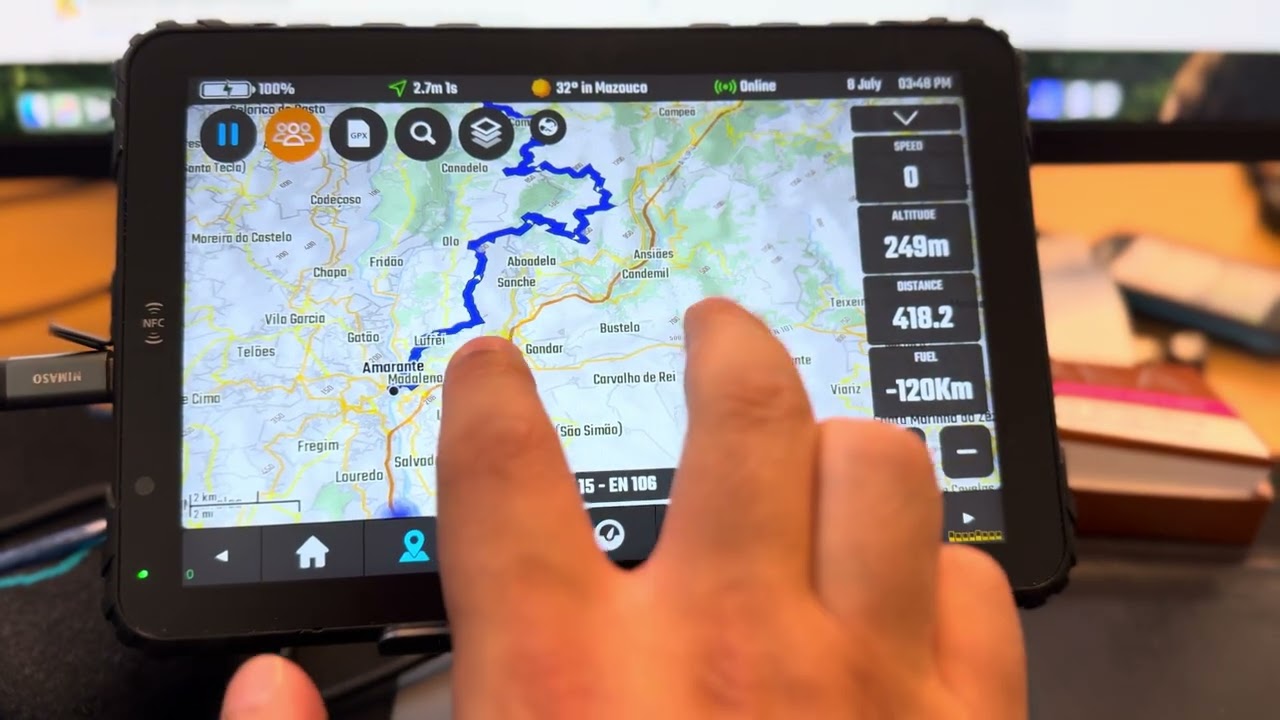
Main Buttons
The main round buttons are the most important buttons in the map view.
1 - Follow Location Mode - Cycles between the enabled modes which define how the map will be animated to follow and update your location.
2 - Group Manager - Opens the dialog where you manage everything related to Groups. Read about the Group Manager here.
3 - GPX Manager - Opens the dialog where you manage everything related to GPX files. You can read about the GPX manager here. You can long press on this button to go directly to the GPX Recorder dialog.
4 - Locations Manager - Opens the dialog where you manage everything related to Location (search, manage your location, save new locations and much more).
5 - Map Configuration - Opens the dialog for all the settings available to customize the map. It is also here where you manage your offline map downloads.
6 - Online Layer Toggle - Cycles between the enabled online layers (layers like satellite view, rain map, temperature map, etc).

Follow Modes
In the photo you can see the basic and default follow location modes, you can tap the button to cycle between all the enabled modes.
Disabled (empty arrow) - Map will not move to follow your location.
Top North - Map will follow your location with fixed orientation where the top of the map always faces north.
Face Travel - Map will follow your location and rotate so that the top of the map is always facing your actual orientation.
Paused - The map is paused (not following your location) because you had some interaction with the map that triggered this state (example: you moved the map with your finger). You can tap the button to resume to the previous state.
There are other advanced follow modes that we will cover later on another article, those other modes are disabled by default and you need to enable then in the map configuration settings.

Widgets and More...
On the right side of the map you have the widgets area, these widgets can be hidden by using the Widget Toggle in the top - tap once to toggle between visible/hidden, long press on this button if there is any empty slot that you want to re-enable.
The 4 widget slots can be changed to any other indicator, there are many available indicators (GPS, Trip, OBD, etc), tap any of the slots once to open the indicator selector dialog.
Some widget indicators also have long press actions, for example, trip indicators, when you long press on them, will show the Trip Reset dialog. In the same way, the calculated fuel level indicator will show the fuel level reset dialog.
Bello the widget indicators you have the zoom buttons, these two buttons also have a long press action, press and hold both zoom in and zoom out buttons to toggle Auto-Zoom and Auto-Tilt (which are both also available in the Map Configuration settings).
Touch Gestures
The available map gestures are very similar to most navigation apps:
One Finger Map Drag - Tap and drag the map around to move its position. If there is an active follow mode it will pause it.
Two Fingers Pinch Zoom - zoom value will be kept/saved if you have an active follow location mode.
Single Finger Double Tap - will zoom in to the tap location, value will be kept/saved if you have an active follow location mode.
Two Fingers Single Tap - will zoom out, value will be kept/saved if you have an active follow location mode.
Two Fingers Up / Down - Adjusts map tilt (3D style perspective) - value is kept and saved only if the active follow location mode is "Face Travel"
Two Finger Rotate - use two fingers in a rotation motion to rotate the map left and right.
Map Long Press Action
You can use your finger to tap and hold anywhere on the map to get a context menu with actions like "Save Location", "Share", "POI Search" and "Navigate".
The dialog also shows you the distance between your current location and the map point and the road information if available.
Map Legend - Topographic
The topographic map was specially designed to allow you to quickly navigate off-road.
It includes altitude lines with text labels with the different altitudes.
Dirt-roads are graded by ground condition using up to 4 different levels with easy identifiable colours.
The offline map source includes OSM data and SRTM1/Lidar contour lines that can go as low as 10m.
You can also configure some of the topographic map style specific settings.
For a even more detailed terrain you can also enable hill shading and even toggle satellite image.
Topo map is available in both light and dark modes.
Roads Examples

Off-Road / Unpaved Details
Track Grade 1
Solid surface or with information for specific content: Compacted / gravel / fine_gravel / pebble-stone.
Sometimes paved and sometimes used by cars and for daily commute.
Color: Light Green / Green
Difficulty: Very easy and often used for daily commute

Track Grade 2
Mostly solid but unpaved usually with surface of gravel.
Very similar to grade 1.
May be applicable to heavily degraded and crumbled roads which was paved in past.
Color: Green / Dark Green
Difficulty: Usually very easy

Track Grade 3
Even mixture of hard and soft materials.
Always an unpaved track.
Color: Yellow / Dark Yellow
Difficulty: Usually easy unless with rain!

Track Grade 4
Mostly soft.
Always an unpaved track prominently with soil/sand/grass, but with some hard or compacted materials mixed in.
Color: Orange / Dark Orange
Difficulty: Usually up to medium difficulty depending on the weather

Track Grade 5
Soft or with information specifying it as: rock / soil / mud / sand / grass
Always an unpaved track lacking hard materials, uncompacted, most of the times its sand!
Color: Red / Dark Red
Difficulty: Up to hard difficulty specially with rain and heavy motorcycles

Ungraded Track
This means the track ground condition is not specified, it should be unpaved but no further information is present.
Color: Teal / Brown
Difficulty: Some of the hardest tracks are ungraded, so expect anything!

Paths
The path ground condition varies A LOT!! It’s worth to mention that paths are usually a generic or multi-use path open to non-motorized traffic.
Color: Teal / Light Blue
Notice: Often, motorcycles are not allowed!

Bridleways
A way intended for use by horse riders (primarily) and pedestrians (depending on country-specific regulations). Most of the times you cannot ride with a motorcycle here!
Always check country specific laws first!
Color: Purple / Pink
Notice: Most of the times motorcycles are not allowed.
